Tuesday, October 22, 2019

October 2019 Cactus Update: Gymnocalycium horstii Care.

Gymnocalycium horstii Growing Guide

Two days ago, wife bought me a cactus for my upcoming birthday!
She ia totally not into cactus at all, so it is once in the blue moon kind of behavior for her to do this.


Anyway, it is a mature specimen sized Gymnocalycium horstii or also known as Gymnocalycium buenekeri.


This time, I will share a brief guide on how to care for G.  horstii.


Basically, G.  horstii is commonly called as "spider cactus", this is due to its spider like spines.


Description: G. horstii is a distinctive large cactus, minimally spined with a green ball-shaped body. Usually solitary or slowly clustering as they age.


Stem: smooth, globoid, shiny green, up to 20(-25) cm in diameter.


Ribs: 5-6 cm wide, rounded, somewhat acute, deeply furrowed.


Spines: Few (usually 5 of which one pointing downward others to the sides) , yellowish white, sparse, straight to slightly curved, definite and very irregular, up to 3 cm long.


Flowers: White, pale pink, pink or pale purplish up to 11 cm long and in diameter.


Fruits: Ovoid, blue-green


Remarks: 
Gymnocalycium buenekeri and G. horstii are very similar if not identical, both have very similar great pink flowers and the same (usually) five ribbed appearance, and good yellow spines

Cultivation: Very easy to grow, this plants offers no cultivation difficulties. 


Watering: Summer grower needs moderate to copious waterings in summer. Once a week is reccomended for temperate climate. 


Temperature: Quite frost resistant if kept dry in winter -4° C. Min temp is 10° C and optimal is 24-26° C.


Fertilizer: Feed with a high potassium fertilizer in summer. 


Sun Exposure: Full sun to light shade


Repotting: every 36 months or when pot is full.


Propagation: can be grown from offsets. Fresh seeds germinate well and seedling grow on a vigorous rate.


Thursday, October 17, 2019

October 2019 Cactus Update: New Cactus Addition My Collection Part 2

New Family Members

My shipment just arrived few days ago, it took 2 weeks from the date of purchase to parcel delivered.

eBay is a nice place to look for cactus, big number of cactus in my collection bought from eBay. Depending on seller and cactus type, you can get em cheaper than locally sold. There are some sellers I frequently buy from them such as:

#1 https://www.ebay.com.my/usr/cactuschina?_trksid=p2047675.l2559

#2 https://www.ebay.com.my/usr/a_little_of_each?_trksid=p2047675.l2559

#3 https://www.ebay.com.my/usr/astrophyt33?_trksid=p2047675.l2559

This week, I received my long awaited Lophophora and Ariocarpus.  This time, I bought Grafted Lophophora with tons of pups! I am planning to graft em and expecting them to get into giant specimen size in coming years. 

Bear in mind that grafted Lophophora is growing very fast, they may lose value especially when Asian grower replicate them like rabbits. Having said so, I kind like them, so we hall see how it goes

Below is the video link on my new Cactus, I'm trying new method of writing blog which includes video attachment and linking my pictures to Pinterest!


I will mix pictures and video later on, hope this is enjoyable to watch.

Cheers

Wednesday, October 16, 2019

October 2019 Cactus Update: New Cactus Addition My Collection Part 1


New Family Members

My shipment just arrived few days ago, it took 2 weeks from the date of purchase to parcel delivered.

eBay is a nice place to look for cactus, big number of cactus in my collection bought from eBay. Depending on seller and cactus type, you can get em cheaper than locally sold.

This week, I received my long awaited Lophophora, Ariocarpus, Coryphantha and Astrophytum. Astrophytum are obviously gonna be grafted onto bigger root stock. 

Below is the video link on my new Cactus, I'm trying new method of writing blog which includes video attachment and linking my pictures to Pinterest!


I will mix pictures and video later on, hope this is enjoyable to watch.

Cheers

Tuesday, October 15, 2019

October 2019 Graft Update: How To Graft On Harrisia Root Stock

How To Graft Ariocarpus On Harrisia jusbertii Root Stock

This applies to medium to large sized scion graft. Harrisia jusbertii serve as a great permanent root stock in most countries, It wasn't the fastest but might last longest compared to others.

Step 1

To begin with, get a decent root stock; make sure they are actively growing and plump. Never used dehydrated root stock which look flaccid and soft to the touch. 

Harrisia Ariocarpus cactus graft

This Harrisia got a bit scald-looking scar from over application of dish soap lol. But it is doing fine, very solid and actively growing.

Harrisia Ariocarpus cactus graft

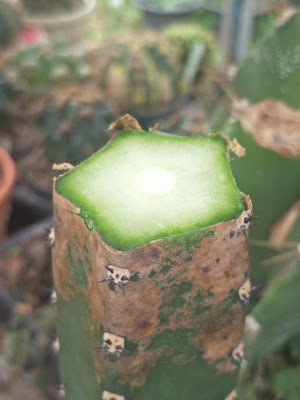
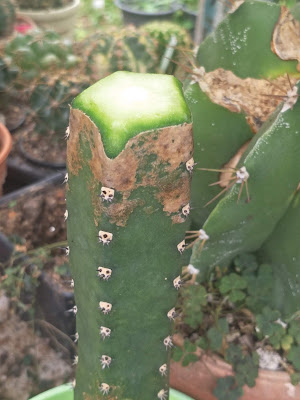
Now, cut the top part of your root stock, it can be the top 2-4 inch up to the mid, as long as the core i.e. middle ring is still soft. Best bet is to cut top 1 inch first and try to match it with scion middle ring, if your scion's ring bigger then cut another inch until they match.


Harrisia is a great root stocks due to their thickness and ring size. The thickness give us a good guarantee of grafting success as there is more contact between scion and root stock. Plus, it always put out a lot of sticky sap which means it is very unlikely to fail from dryness unless they does not place correctly or zero pressure applied.


Step 2


Cut your scion and make sure it is a level cut, skewed or concave cut on the scion may fail the graft, mostly due to shrinkage. I use Ariocarpus Godzilla variegated for this graft, around 4 cm big. The original plant is grafted onto a Myrtillocactus root stock but its been 6 months and no root is coming from the Myrtillocactus. Thus, this can be considered as my last measures to save the Ariocarpus.

Harrisia Ariocarpus cactus graft


For both scion and root stock cut, make sure you do it with sterile and very sharp knife. 


Harrisia Ariocarpus cactus graft


Make sure the ring is similar in size to get better connection between scion and root stock.

Harrisia Ariocarpus cactus graft

Step 3


Match their cambium ring, as long as they touch each other; the graft will work well. Makesure the stay moist, never leave them too long or they will  dry up and shrink or sunken.


Harrisia Ariocarpus cactus graft


Step 4

Providing pressure and preventing the scion from moving are two main concern in grafting. Without pressure holding the scion, it will detach or partially detach; which may lead to scion death or may require re-grafting.

Harrisia Ariocarpus cactus graft

I use plastic food wrap and rubber to hold them together, some times just rubber. Cereus root stock has thick long thorns that can be use to hold the plastic, but additional rubber use can reduce the risk of losing pressure.

Harrisia Ariocarpus cactus graft


Pull the plastic and make sure it is fittingly tight, not loose but also no too tight. you can test the scion after attaching plastic cover, if it shift to any direction; adjust the holding pressure.

Harrisia Ariocarpus cactus graft

Apply rubber to hold your plastic cover in place, I use one rubber but fold it once so it stretch tighter.

Harrisia Ariocarpus cactus graft

Do your final adjustment if needed and left them under shade for a while. the advantage of using plastic wrap is they retain moisture from cut so they don't shrink quickly. Sometimes I forgot about my grafts, the scion just pop out of the plastic and continue growing; just make sure it is soft plastic wrap though.

Hope this explanation helps.

Thanks for reading guys.

cheers.

Monday, October 7, 2019

October 2019 Graft Update: How To Graft On Cereus Root Stock Part 2

How To Graft Harrisia jusbertii On Cereus Root Stock

This applies to medium to large sized scion graft. Cereus hildmannianus serve as a great permanent root stock, It wasn't the fastest but might last longest compared to others.

Step 1

To begin with, get a decent root stock


Cereus Harrisia jusbertii cactus graft


Cut the top part of your root stock, it can be the top 2-4 inch and try to match it with scion middle ring, if your scion's ring bigger then cut another inch until they match.


Cereus Harrisia jusbertii cactus graft


Step 2

Cut your scion and make sure it is a level cut. Bevel the edge to reduce the risk of detachment.
Cereus Harrisia jusbertii cactus graft

Make sure the ring is similar in size to get better connection between scion and root stock


Beveling the cut edge is optional, but I always do so to prevent two complications later on. One is the risk of cut surface to dry and shrink.

Step 3

Match their cambium ring, as long as they touch each other; the graft will work well. Makesure the stay moist, never leave them too long or they will  dry up and shrink or sunken.


Cereus Harrisia jusbertii cactus graft


Provide pressure between scion and root stock. I use plastic food wrap and rubber to hold them together. Cereus root stock has thick long thorns that can be use to hold the plastic, but additional rubber use can reduce the risk of losing pressure.


Pull the plastic and make sure it is fittingly tight, not loose but also no too tight. you can test the scion after attaching plastic cover, if it shift to any direction; adjust the holding pressure.

Cereus Harrisia jusbertii cactus graft

Cereus Harrisia jusbertii cactus graft

Do your final adjustment if needed and left them under shade for a while. the advantage of using plastic wrap is they retain moisture from cut so they don't shrink quickly. 

Hope this explanation helps.

Thanks for reading guys.

cheers.

Thursday, October 3, 2019

October 2019 Graft Update: How To Graft On Cereus Root Stock Part 1

Best Way To Graft Astrophytum On Cereus Root Stock

This applies to medium to large sized scion graft. Cereus hildmannianus serve as a great permanent root stock, It wasn't the fastest but might last longest compared to others.

Step 1

To begin with, get a decent root stock; make sure they are actively growing and plump. Never used dehydrated root stock which look flaccid and soft to the touch. Cereus also can be grafted while they are on mother plant and you can root them later once attached.


Cereus cactus graft

Cereus cactus graft

Cut the top part of your root stock, it can be the top 2-4 inch up to the mid, as long as the core i.e. middle ring is still soft. Best bet is to cut top 1 inch first and try to match it with scion middle ring, if your scion's ring bigger then cut another inch until they match.


Cereus cactus graft

Cereus is a nice root stocks due to their thickness and ring size. The thickness give us a good guarantee of grafting success as there is more contact between scion and root stock.


Cereus cactus graft


Step 2


Cut your scion and make sure it is a level cut, skewed or concave cut on the scion may fail the graft, mostly due to shrinkage. I use Astrophytum myriostigma variegated for this graft, around 7 cm big. Cereus, Harrisia and Myrtillocactus are not that suitable for seedling grafting, better choose proper sized scion for these root stock.

For both scion and root stock cut, make sure you do it with sterile and very sharp knife. For hard skinned cactus such as Astrophytum, I will bevel the scion too, this is due to their tendency to shrink more and push themselves upward; and may fail to remain attached.


Cereus cactus graft

 Make sure the ring is similar in size to get better connection between scion and root stock


Beveling the cut edge is optional, but I always do so to prevent two complications later on. One is the risk of cut surface to dry and shrink, if it shrink then the scion will very likely fail to stick or imperfectly attach to the middle ring. Other complication is offsetting of the root stock, it it pups close to scion, it may push it up and out which usually occur anytime during both cactus lifespan.

Step 3


Match their cambium ring, as long as they touch each other; the graft will work well. Makesure the stay moist, never leave them too long or they will  dry up and shrink or sunken.


Cereus cactus graft

Step 4

Providing pressure and preventing the scion from moving are two main concern in grafting. Without pressure holding the scion, it will detach or partially detach; which may lead to scion death or may require re-grafting.

I use plastic food wrap and rubber to hold them together, some times just rubber. Cereus root stock has thick long thorns that can be use to hold the plastic, but additional rubber use can reduce the risk of losing pressure.


Cereus cactus graft

Pull the plastic and make sure it is fittingly tight, not loose but also no too tight. you can test the scion after attaching plastic cover, if it shift to any direction; adjust the holding pressure.

Cereus cactus graft

Cereus cactus graft

Apply rubber to hold your plastic cover in place, I use one rubber but fold it once so it stretch tighter.


Cereus cactus graft

Cereus cactus graft


Do your final adjustment if needed and left them under shade for a while. the advantage of using plastic wrap is they retain moisture from cut so they don't shrink quickly. Sometimes I forgot about my grafts, the scion just pop out of the plastic and continue growing; just make sure it is soft plastic wrap though.

Hope this explanation helps.

Thanks for reading guys.

cheers.

Tuesday, October 1, 2019

October 2019 Cactus Update Part 1: Astrophytum & Coryphantha

Cactus Updates

October 2019

4. Astrophytum sp

#11 Astrophytum asterias

Astrophytum asterias

Astrophytum asterias

This is just a common Astrophytum asterias, around 10 cm wide and 12 cm tall. unlike  A. myriostigma, A. asterias is a hard skinned cactus. Which means it tends to crack more often due to over watering or growing too fast. I find that this species also grow slower than A. myriostigma and A. ornatum.

#12 Astrophytum asterias variegata 


Astrophytum asterias variegate

Astrophytum asterias variegate

Astrophytum asterias variegate

This is the variegate form of A. asterias. They are growing in clusters, variegate Astrophytum tend to form cluster more often in my experience; probably its in their genetic. I love big solitary cactus, they look like a specimen to me but if they produce offsets; its a good things too. More scion for grafting session!

#13 Astrophytum asterias var. Godzilla variegated

Astrophytum asterias Godzilla

Astrophytum asterias Godzilla

Astrophytum asterias Godzilla

This is a whole new level when compared to common A. asterias, you will see lots of bumps and papillae on 'Godzilla' variant. Sometimes also called as var 'Lizard', probably both due to the skin texture that resembles reptile skin. I am waiting for this to grow some offsets, I really want to graft it and increase the flowering chance.

#14 Astrophytum capricorne

 Astrophytum capricorne


I have very few of this species, not very keen on buying a lot of them at the moment. Having said so, it have one of the most wonderful flower among Astrophytum. From what I have read, it can cross with A. asterias; can function as both male pollen donor or as female receiver.

#15 Astrophytum myriostigma var nudum


This is one of my many common type Astrophytum myriostigma. I love them due to their good growth rate and blooming frequency. Can be used to cross with any A. myriostigma or A. ornatum too, you don't know what's the hidden traits they have.

#16 Astrophytum ornatum 

Astrophytum ornatum

Astrophytum ornatum

Astrophytum ornatum

Astrophytum ornatum

This is the biggest species of Astrophytum and I keep them due to their size, growth rate and breeding potential. They are very very spicky and took longer to flower too. But hybrid of A. ornatum and A. myriostigma usually retain the growth vigor and size of A. ornatum, although their characteristic mostly might be in the mix of between the two.

#16 Astrophytum myriostigma var. hakujo 

 Astrophytum myriostigma

Astrophytum myriostigma

The term 'hakujo' means line that connects the dots between areoles. This one is a frequent bloomer but did not put up flower this month though. It is a medium sized Astrophytum but the flat ball shape made it quite attractive. 

#16 Astrophytum myriostigma var. fukuryu hakujo 

Astrophytum myriostigma

Astrophytum myriostigma

Astrophytum myriostigma

This is one of my A. myriostigma var 'fukuryu' that grown from a small 4 cm seedling. It shows good growth vigor and I love the tall can top heavy conical shape it carries. The picture doesn't do justice but it is slightly variegated, with lime green stripes over dark green. Now, this guy is 14cm tall and 11 cm wide.

#17 Astrophytum myriostigma var. fukuryu hakujo white

Astrophytum myriostigma

Astrophytum myriostigma

Astrophytum myriostigma
  
This is one of my cactus from the early days, was 5 cm back then and now scaling up to 10 cm tall and wide; look like sphere shaped A. myriostigma. This is not a fast grower but it carries 'fukuryu' and 'hakujo' traits. Despite the size, it haven't flower yet while other A. myriostigma usually bloom at 5-7 cm big.


4. Coryphantha elephantindens

#1 Coryphantha elephantindens variegata

 Coryphantha elephantindens

Coryphantha elephantindens is one of my favourites. Main reason is their large tubercles and overall size, I tend to get attracted to large cactus.

Scientifically, the term 'elephantidens' means 'elephant tooth' which describes the fang-like spines of this species. The spines are very sharp and hard, which may damage and scar nearby cactus; got to be wary of that.


Coryphantha elephantindens


My largest C. elephantindes is measured 13 cm wide and 14 cm tall excluding spines. They are easy to care and fast grower too, but tend to host spidermites and hate too much water.

Coryphantha elephantindens


Variegated form of C. elephantindens is easy to obtain now, plus comes in cheaper price.

#2 Coryphantha elephantindens 

Coryphantha elephantindens

Coryphantha elephantindens


This is the grafted green form of C. elephantindens and root stock is Cereus spegazzinii. It took one month to grow from picture above,

Coryphantha elephantindens

This guy is same size as its variegated counterpart, I have grafted a good sum of its offsets onto Perekiopsis and C spegazzinii. 

That is it for now, I will update on recent graft in a day or two

Cheers.